Frequently Asked Questions

Device Networking, Wireless Infrastructure, Display Connectivity


USB Device Server FAQs

Portrait worried young woman thinking dreaming has many ideas looking down isolated grey wall background. Human emotions feelings life perception. Decision making process concept.

Currently we only support macOS 10.14 Mojave and earlier. We offer a beta version of SX Virtual Link for 10.15 Catalina. You can download it from the SX Virtual Link product page. If you want to test this beta version, please follow the download instructions, which you can also find on the product page.

The macOS Catalina and later are not supported and the installer of SVL for earlier version does not work for the macOS Catalina and later version.

Please refer to our message here.

The DS-510, DS-520AN and DS-600 allow you to use USB devices over the network as if they were connected locally. Using a USB hub, up to 15 USB connections can be managed (the hub also counts as at least one connection). 

Username is "root" (without quotes).

There is no password assigned by default, please leave the field blank.

If these settings do not work, it is possible that the device has already been assigned a password by a user/administrator. In this case, please reset your device to factory default.

For the devices SX-200, SX-100, SX-2933-S03, SX-500 and SX-600 the default password is "access" (without quotes). 

Please check if the SX-UPTP driver is installed:

Windows: Please switch to "View" - "Devices by connection" in the device manager. There must be an entry with "SXUPTP driver" in the lower part. If this entry is missing, please reinstall SX-VL. Also, the manual installation from the FAQ can be used then.

Mac OS: Please check if there is information about the version number of the SXUPTP driver at "About SX-Virtual Link". If there is only (x.x.x), please reinstall SX-VL. Possibly create a new user and repeat the installation with this user, delete the user afterwards.

If the SXUPTP driver is loaded, please make sure that port 19540 UDP and TCP are not blocked.

Firewall functions can be integrated in any kind of internet security software, VPN clients or network connected software.

USB devices like inkjet printers, multifunctional devices, printers, scanners, digital cameras, USB memory, card reading drives, hard disk, CD/DVD/MO/disk drives, but also exotic devices like Yamaha mixers (01v96, DM1000, DM2000), USB weather stations, USB sewing machines, USB measuring devices are supported.

Devices that use the isochronous data stream, such as webcams, sound or TV cards, are only supported by the DS-510, DS-520AN, DS-600 or newer devices. Some of these devices may not work due to driver problems or delay over the network. 

With a very high probability, yes. The USB Device Servers are generally made for all types of USB devices, so with a few exceptions, all devices will work even if they have not been tested. So, this list is not a list of devices that work exclusively, but only a list of devices SILEX has tested that are guaranteed to work. 

If another USB device works on the device server, the configuration as well as the device server itself can be excluded as the reason. Please make sure that you are using the latest version of SX-VL and your device server has the latest firmware. If the device still does not work, please contact our support team, maybe the USB device is not supported. 

Standard print servers work in a way that only one computer can print after the other. It is not possible to connect to SX-VL from multiple computers at the same time. However, SX-VL has an auto-connect feature that automatically connects when the printer is available again. In addition, the device servers with new firmware also support IP Printing. When a device is busy with SX-VL, the message "Already in use" is displayed as well as the computer name of the user.

Windows®

macOS Mojave and earlier. Catalina, BigSur and later version are not supported.

In general, VPN connections are also supported. Both IPSec and PPPTP connections are supported.

Since VPN routers always have the standard function to prevent broadcast packets to other networks, the USB device servers will not be found by SX-VL by itself. Please enter the IP of the device server directly under "Options" - "Search for device servers" after the broadcast packets have been activated. After that, the device server and the USB devices should be detected in SX-VL.

Port 19540 UDP and TCP in both directions must not be blocked by the router. Simple port forwarding or port forwarding in combination with NAT is not supported. Also the Fritz!remote access solutions are not supported. 

Check the network connection:

Make sure that the LEDs on the device server indicate a network connection. If not: Change the socket, make sure that the plugged network cable works, or the device server is configured according to your WLAN network (DS-520AN).

The green LED is on continuously when connected to the network, the orange one flashes from time to time to indicate network traffic. The PC you want to configure the device with must be in the same network segment for the first configuration.

The AdminManager software uses broadcast packets to detect the devices in the network, these could be blocked by a firewall or router. * See also FAQ "Creating exceptions in firewalls". 

Please make sure you are connected to the device in SX-VL.

Reason 1:

It could be that another device has the IP that you think is the device server. For example, check the web interface.

Reason 2:

The printer driver is not configured correctly. Please make sure that you can print when the device is connected locally.

Reason 3:

The printer is not configured on the correct port: The printer must switch between "online" and "offline" when you connect and disconnect in SX-VL.

Reason 4:

A firewall could prevent the connection from being established correctly. * See also FAQ "Creating exceptions in firewalls".

The SX-VL software uses broadcast packets that are sent to 255.255.255.255. If your firewall or router blocks this, the device server will not be found.

You can enter the address directly in SX-VL under "Options" - "Search for Device Servers" or define a broadcast address (e.g., 192.168.1.255). 

The device server is probably set to DHCP and gets a different IP assigned by the DHCP each time.

Either use a static IP or create a static DHCP entry (if your DHCP has such a function). 

The device server supports only TCP/IP, no netbios over TCP/IP, therefore the device can not be found there. Please use SX-VL.

Check that the network connection works, and that the PC is in the same network segment as the device server (without router in between).

Use either the Device Server Setup software if you do not know the current IP or the web interface if you already know the IP and only want to change it. You can check the IP e.g. in the log of your DHCP.

Please make sure that you set DHCP to "disabled". 

All settings are set to factory default when you press and hold the small black button on the device server while plugging in the power adapter. After about 6 seconds, the orange status LED will be on continuously, the device is then set to factory default, you can release the button. If your print server has 4 dip switches, please set dip switch 2 to ON. 

Username is "root" (without "), no password is assigned. If these settings do not work anymore, please reset your device server to factory default. 

Once connected to the printer in SX-VL you can use the status monitor from the manufacturer. All information is transmitted as if the device was connected locally. 

The difference is that a device controlled by Device Server function can be connected to only one PC at a time, it is then available with all functions as if it is connected locally. If several users want to use the device, they must take turns. So, a device server establishes a connection to the PC, all data is passed on. A print server usually only waits for incoming data in the network and forwards it to the printer.

With the appropriate firmware version, the device servers also have IP printing support (like a print server). 

You can use it to reset the device to factory default (see also FAQ item above) or, if the connected printer has its own fonts, to print a configuration page by pressing the button for 1-2 seconds during normal operation. Not all printers support this function. 

The USB2.0 port on the DS-510, DS520AN and DS-600 support USB 2.0 Hi Speed (480Mbit).

The USB3.0 port on the DS-600 supports USB 3.0 SuperSpeed (800+Mbit). 

Activate the "AutoConnect" function in SX Virtual Link under the software settings or with a right click on the connected USB device in the device options.

Yes, SX-VL must be installed on each client. This software includes the virtual USB port driver necessary to use the USB devices connected to the device server. 

There are 3 LEDs on the front of the device:

- Wireless

- status

- Link


When the Link LED is on, the Status LED flashes from time to time:

An Ethernet connection is active, the Status LED signals network traffic.

When the Wireless LED is flashing:

The device is waiting for an ad-hoc wireless connection. (Peer to peer with a notebook for example).

When the wireless LED is on, the status LED is blinking:

The device is connected via ad-hoc connection. (Peer to peer with a notebook e.g.)

If the Wireless LED is on and the Link LED is blinking:

The device is trying to connect to a WLAN access point (or WLAN router), but it is not working.

Possible reasons: MAC filtering, Wrong SSID, Wrong encryption method, Wrong encryption key.

When the Wireless and Link LED is on, status is blinking:

The device is successfully connected to a WLAN access point (or WLAN router), the Status LED signals network traffic.


The device has a detection only at startup whether a network cable is connected or not. If the network cable is plugged in after power up (after the power supply), the Ethernet interface is still not activated.

If the cable is plugged in and only WLAN is activated, the cable is broken, not plugged in correctly on both sides or the switch port is defective. 

No, either the drivers incl. libraries would have to be developed completely by yourself or published as open source.

So, there is only for the listed operating systems the virtual USB port driver.

Under other, TCP/IP capable operating systems only IP printing via LPR, RAW or IPP is available. 

Please make sure that you have started the correct version of the SX-VL setup. COSETUP.EXE automatically takes the correct version. Setup32.exe is for 32bit systems, Setup64.exe is for 64bit systems.

Please make sure you are logged in as administrator. Some OEM versions, especially of Windows 7 have special security settings, please make sure that the administrator has full access to the directories "C:Programs(x86)", "C:Programs" and "C:Windows". If a user named TrustedInstaller is listed, please add the Administrator user for these directories. Right click on the directory, properties, owner.

If this does not work either, then you can install SX-VL manually:

  1. copy application from another system.
  2. install SXUPTP.INF from the directory "files" via the item "Hardware". (See instructions for Windows 7 as an example)

SSH is only usable for debugging and not for the configuration of the device.

Devices with isochronous data stream may only work on the USB 2.0 port. Please check if the other port, the USB 2.0 port works. 

The NAS function of the DS-600 only supports FAT12/16/32.

With the connection via SX Virtual Link, the devices DS-510, DS-520AN and DS-600 (Device Server) support NTFS as file format. 

The offline and online status only works when the device is connected locally via USB cable and has nothing to do with the real status of the printer.

Please go to Printers and Faxes and select the appropriate printer, right click on the printer and select "Use printer online".

Make sure that the CX-Print TCP (C-Series) or Standard TCP/IP Port port (SX-Series) is installed correctly and points to the correct IP. Printing should then work. 

The "full feature mode (device server mode)" was mainly developed for Mac OS users. When this mode is enabled in the setup or via web interface, all functions are used with the help of SX-VL. It is necessary to connect to the device using SX-VL before printing, scanning or accessing the card reader. The printer must be installed on a port with the description "virtual printer port for USB" and must switch between online and offline when connecting or disconnecting in SX-VL. This mode is the only one in which printing via Mac OS is possible (unless you have network printer drivers). 

Please check the status of the LEDs. If the LEDs are still working, the device is not defective.

You probably just need to reconfigure the device.

If the LED's really do not work anymore, not even when the power adapter is plugged in, then the device might be defective.

Please note that some devices do not have LED's that are always on. Only the status LED flashes for one second when the device is started and when no network cable or a defective one is connected. The network cable must be connected to a switch or hub in addition.


If no LED is working, please contact our support with this information and fill out the RMA form from the link on the left, with the RMA number from support. 

The supported devices and operating systems depend on the product and differ. Basically, silex supports TCP/IP, NetBEUI over TCP/IP, IPX/SPX for NetWare, AppleTalk for Macintosh. 

The supported network interfaces vary depending on the product:

10 BASE-T

10/100 BASE-TX(Auto-detection) 

Yes, you can send print jobs from several computers at the same time, because our print servers can accept print jobs on several ports from different operating systems. The print jobs are processed one after the other.

Note: When printing via NetBEUI, error messages may occur if several print jobs are sent at the same time. Please restart the print job then. 

The silex print servers support the setting of a gateway via TCP/IP, so you can also send print jobs across routers.

Check the following :

It could be that the network equipment is defective: please check if cables, ports on hub, router or switch are working.

An LED must go on at the print server as soon as you connect it to a router, switch or hub via network cable.

Check if the device is turned on and the power outlet is working.

Computer and print server must be in the same network segment for the first configuration.

Check if the PC has a valid IP address and if TCP/IP is enabled.


Check if any security software is blocking communication. During setup, all firewall or security software should be disabled. If this is running in combination with a virus scanner, this should also be disabled.

Reset the device to factory default: Press and hold the black button for about 6 seconds while plugging in the power adapter. As soon as the status LED lights up permanently you can release the button.

You can also do the setup completely via web interface if you already know the IP. You can find it out via AdminManager (tool for advanced configuration) or e.g. DHCP Log (an information in your router, access point or DHCP server).

Check if another device has the IP, e.g. by opening the web interface.

The printer drivers might not be installed correctly: Check if you can print when the printer is connected locally.

Check if the port is configured correctly: If in doubt, delete the CX port or standard Windows TCP/IP port and create a new port.

Make sure that no firewall is blocking communication. 

Your print server probably obtains an IP from a DHCP. This assigns another IP after the lease time has expired.

Please deactivate DHCP/BOOTP/RARP and assign a fixed IP. 

Please make sure that DIP Switch 2 is not set to on. (If your device has no dip switches this may not be the reason). 

If you use the standard TCP/IP port make sure that "LPR Byte Count" is enabled.

The printer driver could be the wrong one. 

Please activate DIP switch number 3 and restart the device. If your print server has a small black button, press it for about 2 seconds.

The printer must have its own fonts to print this page. So not all printers support this function. 

The IP should either be assigned by your DHCP, i.e. be assigned automatically, or you must assign an IP to match the IP of your computer.

If your computer has 192.168.1.10 you should assign 192.168.1.11 to the print server.

Subnet mask in both cases 255.255.255.0. You can find out your own IP under Windows with the command "ipconfig -all". Go to "Start" - "run", enter "cmd", then "ipconfig -all". If you have any questions, please contact our support for a concrete example for your network. 

Please check if the printer is installed on a port that has USB00 + a number + possible description as name.

If you can't rename the SX port just delete it and create a new port. In the last step you can assign the name.

Please reset the device to factory default and run the setup again. 

The serial number is the Mac address and is printed on the back, it starts with 00:80:92: 

There are no network cables, USB cables or USB hubs included. Please purchase them according to your requirements. 


Virtual Environment

Yes, it is generally possible.

Please make sure that the USB drivers are installed, our system is based on the Windows USB drivers, if the virtual system has no USB hub hardware the drivers will not be installed. Since ESX Server or Hyper-V does not support USB directly, the USB drivers will not be installed in the guest system by default. However, since the SX-Virtual Link software relies on these drivers, they must be installed.

Please copy and rename the following files from the Windows installation CD:

- Source: usbd.sy_ in the i386 directory of the CD

- Destination: usbd.sys in the system32drivers directory of the guest operating system.

If this does not work, it might be necessary to extract the file from the "driver.cab" file and copy it to the appropriate location.


After this file is copied, please reboot the system once, then you can proceed with the normal installation of SX-Virtual Link.

Hyper-V is supported in every version as far as we can tell. ESX is supported in version 3.5 and vSphere 4.0 - 4.1 is not tested yet.


Please make sure that the guest operating system has direct network access. NAT is not supported. 

Yes, SX-VL can be installed on terminal servers as long as they are based on an operating system that is included in the list of supported operating systems for SX-VL.


The USB devices are then mounted as if they are really connected locally and can then be used with any application that also works when the USB device is connected locally. Since the terminal users do not have their own device manager, it is not possible to make the USB devices available to only one specific user. So as soon as a user connects a USB device, it is available to all users logged on the same server.


For the use of USB devices on a Windows server operating system, which is used as a terminal server, so called "multi user capable USB drivers" may be required. You can get these drivers from the manufacturer of your USB device.


SX-VL generally operates on device manager level, therefore it can be started only once. This has the background, so that user 1 does not connect device 1, user 2 disconnects it again in the same moment. It is therefore recommended to either set up a user that connects all USB devices or to install SX-VL as a service. If it is mandatory that single users can disconnect and connect devices, the

connect devices, the script based version can be used. For this purpose a shortcut with a .bat file can be created on the desktop.


It is possible that machine 1 connects to USB device 1,2 on device server 1, machine 2 connects to USB device 3,4 from device server 1, also to USB device 1 from device server 2.


The only thing that is not possible is that machine 1 and 2 connect to a USB device at the same time. Otherwise a free

assignment is possible. The device servers all support up to 15 USB connections with a USB hub, the hub also counts as at least one connection then. 

No, either the drivers incl. libraries would have to be developed completely by yourself or published as open source.

So there is only for the listed operating systems the virtual USB port driver.

Under other, TCP/IP capable operating systems only IP printing via LPR, RAW or IPP is available. 

SX Virtual Link Lite is the service version of SX-VL. Ideally suited for Server OS to ensure that USB devices are automatically reconnected without admin or user login after an unattended reboot of the server, once the service has been started by the system after a reboot. Please use the special version, which you can find here as a download. 

Most software protection modules (dongles), but also smartcard adapters and license keys often have a function integrated that resets the USB communication at irregular intervals. This results in the USB device then being disconnected via the device server.

The SX-VL graphical user interface does not check as often if the USB device is available again and does not try to reconnect the USB device infinitely often, because it is assumed that the user has to reconnect to the network at some point or the USB device has to be plugged in again.

Especially on servers this leads to a situation where the software that needs the dongle then stops working.

The best solution is to use the script based version of SX-VL and run the reconnect command every few minutes via the task scheduler.

If the dongle is still connected, the SX-VL CUI version will inform you that the USB device is already connected. If the dongle was disconnected, it will be reconnected automatically.

An alternative to the script based version of SX-VL is also SVL-lite, the service version of SX Virtual Link, which is described in more detail and linked in the FAQ item "How can I install SX-VL as a service".


Serial Device Server FAQs

Currently we only support macOS 10.14 Mojave and earlier. We offer a beta version of SX Virtual Link for 10.15 Catalina. You can download it from the SX Virtual Link product page. If you want to test this beta version, please follow the download instructions, which you can also find on the product page.

The macOS Catalina and later are not supported and the installer of SVL for earlier version does not work for the macOS Catalina and later version.

Please refer to our message here.

Serial Port Emulator from silex is not tested on operating systems other than those listed. However, it is always best to have an application that can access the network directly. Hyperterminal for example can not only access COM1 and COM2, but also directly access the network via TCP/IP. In this case you don't need to use a Serial Port Emulator.

If you need a Serial Port Emulator software for Windows 7 for example you can find more information about a third party software here.

Please note that this is not Silex software. Silex does not support or take responsibility for anything related to this third party software. Please contact the software vendor yourself beforehand if you are still unsure about certain features or compatibility..

The easiest way is always to set up the following scenario:

PC 1 connected via the local serial port with a serial cable to the Serial Device Server.

Start Hyperterminal on this PC with the following settings:

Connection via: COM1 (local com port)

Bits per second: 115200

Data bits: 8

Parity: none

stop bits: 1

Flow control: none

PC 2 is connected to the network where the Serial Device Server is and can ping it. Start Hyperterminal on this PC with the following settings:

Connection via: TCP/IP (Winsocket)

Host address: 192.168.101.178 (example - this is the IP of the Serial Device Server)

Port number: 3001 (default setting - checkable via "sh ip" and telnet on Serial Device Server)

Now if you type something on PC 1 in Hyperterminal, it will appear on PC 2 in Hyperterminal and vice versa.

Then you know that the network connection is working, the Serial Device Server configuration is ok.

The next step is to use the serial port emulator if necessary. If this also works you can use your application and serial device instead of Hyperterminal and PC 2. Please make sure that the serial port on the Serial Device Server is adjusted to your serial device. 

In a normal scenario, one part of the connection is always the active part that establishes the connection. If you have 2 passive devices or a server that waits for incoming connections, it may be necessary to configure a Serial Device Server to actively send data to a specific destination.

In this case you should configure Serial Device Server e-cable mode with destination IP and port.

This feature also allows you to connect 2 Serial Device Servers over a network and establish a serial tunnel.

One Serial Device Server will then establish the connection. 

The password for serial device servers ex works is access.

Please pay attention to use lower case letters. 


Display Connectivity FAQs

z-1-interfaces

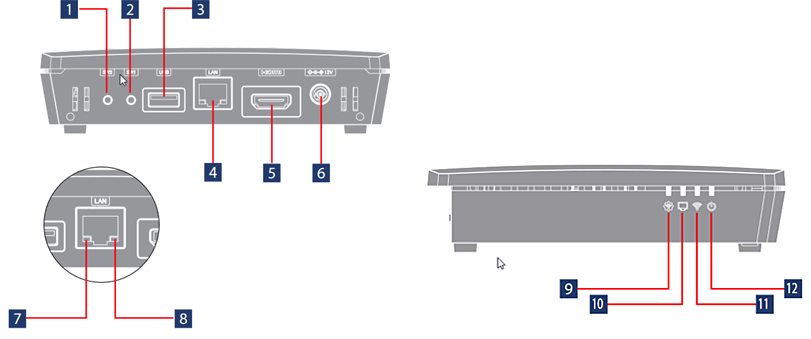
1. function button (SW2) 2. reset switch 3. USB port 4. LAN port 5. HDMI port 6. power supply connector 7. LINK LED 8. LAN STATUS LED 9. STATUS LED 10. display LED 11. WLAN LED 12. power LED

Connect the Z-1 to a display using an HDMI cable. If you connect the Z-1 to a network with DHCP, the Z-1 will automatically obtain an IP address. Alternatively, the Z-1 will assign its own IP address as an access point. The IP address for logging into the web interface of the Z-1 appears on the start screen.

Enter the IP address in a browser of your choice. 3.

you will be asked to enter a password. Enter a password to log in to the web interface. 4.

choose one of the 3 setup options and complete it

the Z-1 is ready to be set up.

The default SSID with the corresponding password can be found on the start screen of the Z-1 under the QR code. 

Use the function button SW1 to reset the Z-1 to factory settings.

Use the function button SW2 for the following functions 1) Change the transmission mode (short press) 2) Use the Smart Setup / WPS function (long press).

To use the extended screen mode, please install the AMC Meeting Display Extension driver from our website: https://www.silextechnology.com/de/z-1 . After successful installation and restarting AMC Meeting, the "extended screen" function will be available under the screen selection. Currently the extended screen mode is only available for an external screen. It is possible to display the screen extension on multiple screens via the master/slave mode.

Stay up-to-date on silex's Product and Technology

Connect your USB Devices to your Wireless Network to Setup your Home Office

Featured Blog

If you have a printer and want to put it on the network so everyone in your family, including students learning remotely, can use it, our USB device servers can help you achieve that.

Read More

How to Setup Silex USB
Device Servers

Featured Application Note

This application note explains the steps required to get Silex's USB device servers (DS-510 and DS-600) up and running with your device in the quickest amount of time. 

Download